Relax! The benefits of stretch and fold dough development

I have a sourdough formula that stands as my family’s main bread (we gave up buying bread from the store about a year ago).  We use it for sandwiches, toast, French toast (when it’s a little stale), crouton (when it’s REALLY stale), broiled, baked, fried, plain, you name it.  It’s good.

I make a 3 lb batch which I normally shape into a 2 lb loaf and use the other 1 lb to play with other shapes like torpedoes.  Normally I mix the ingredients, hand knead for 10 or 12 minutes, primary ferment for 1 1/2 hours, shape, proof, and bake.  It sounds like a lot, but there is only about 15 minutes of active time for me in that process.  Earlier in the week, I started to make my normal 3 pound batch and had something pop up at work.  I essentially had time to mix the ingredients and set the mixing bowl aside.

While working, I kept feeling concerned about how the dough would develop (anxious about gluten development is for the geek in me) and I figured it was a good day to try the stretch and fold technique favored by so many home bakers.  This technique doesn’t manually develop the dough like kneading does, but allows enzymes to do the work of gluten development for you.  Which takes time and not muscle.  The basic idea is to let the mixed ingredients sit for 40 minutes, then pour them out on the counter and stretch them and fold them and plop them back in the mixing bowl for another 40 minute rest.  Repeat this stretch, fold, and rest 3 or 4 times and you have a nice dough that is developed by brains and not muscle… or at least by science.

In my attempt to bake bread, I kept getting pulled away.  So between the 2nd and 3rd stretch I threw the batch in the refrigerator and left it there for 4 hours or so.  I then pulled it out of the fridge and let it warm up so I could stretch, fold, and then back in the bowl for a rest.  After an hour I was able to shape 2 loaves (about a 1 1/2 lbs each) into some bread pans.  Unfortunately, I was pulled away again so I threw the pans into the refrigerator for an overnight retard.  The next morning I pulled out the loaves and let them warm up on the counter again, for about an hour, and warmed up the oven for some baking.

At this point, the dough had been stretch and folded 3 or 4 times, but was in and out of the refrigerator 2 times and was nearly 24 hours old.  To my surprise the dough still looked good.  It had developed into a strong airy mesh of dough with lots of character.  When I shaped the dough it was supple but very resistant to shaping.  I normally used to the knead method of dough development and the shaping is done with supple but mushy dough.  This was far different.  The shaped loaves where huge in the pan before proofing!
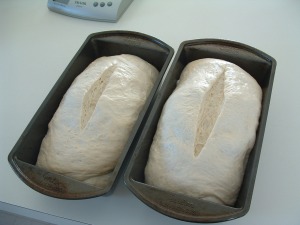
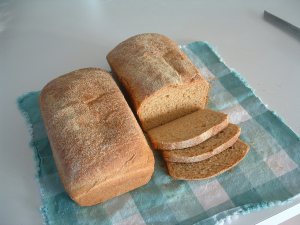
Stretch and fold loaves
I scored these stretch and fold loaves right before baking them. Check out that character in the scores!!! wow.

Once the loaves baked, I was surprised at how light and tender the crumb was (I wish I had a good shot of the crumb).  One thing I noticed was that the sour part of the sourdough was VERY tangy.  It might be too tangy for some of our normal uses for bread, but as toast and sandwich bed it’s super good.
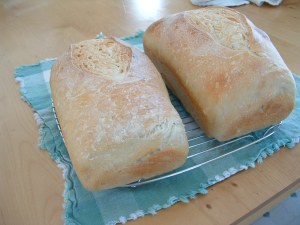
Bread Loaves cooling on a rack
Once out of the oven the loaves smelled so tangy and good. Everyone was ready to have a bite!

I’m impressed with the crumb of the bread; it is so light and airy.  I’m pretty sure it is due to the dough development technique.  I’ve kneaded or dough-hooked my bread for a couple of years now and haven’t had this type of development before.  Also, I’m impressed with how durable the bread was.  I neglected it many times and simply stuffed it in the fridge anytime I didn’t have time to deal with it.  AND, it still turned out delicious.

The only draw back is that stretch and fold takes so much time!  3 or 4 stretch, fold, and rest cycles is nearly 4 hours of waiting.  I can finish off two batches of knead and proof bread in that time.  I’m willing to try all of my formulas with this technique though.  I wonder if my Greek Celebration bread would have been so airy and light.  It might have been really good with some more air in it.  Does anyone know how to stretch and fold pizza dough?
BBA Challenge: Brioche

The challenge continues!

This week I made Brioche, which is a super rich and buttery bread.  Peter R. suggests in book, The Bread Baker’s Apprentice (2001), baking Brioche with its classic shape à tête. But, being the rebel that I am, I decided to make it as pull-a-part rolls.  Something I’ve wanted to do anyway.  Additionally, I had a party to bake for too!  A perfect match, something new to bake and a reason to bake it.

The formula for Brioche calls for lots of butter, so mixing, gluten development, and throwing it in the refrigerator to stiffen up is just about the only way you can shape the dough.  I notice that while shaping the pull-a-part rolls as soon as the dough warmed up (from my handling the dough) it would get sticky and make a mess.  So speed was  important.

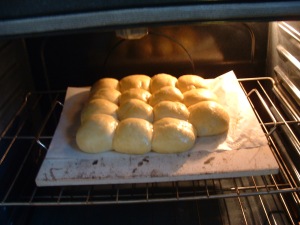
Brioche pull-a-part rolls in the oven
I finally remembered to take pictures for this blog after I slid the rolls in the oven!

After shaping the dough quickly I let them sit for 2 hours, applied egg wash, and let them sit for 30 more minutes.  In the 2 1/2 hours of proofing they swelled up nicely.  Once we were close to party time I slid them directly on a baking stone at 400 degrees.

Baked Brioche pull-a-part rolls
Once baked they swelled up and turned shiny brown

These were ready for our guests and boy did they devour them too!  We ate soup, brioche, and enjoyed ice cream and brownies with frosting after the meal.  I’ll add this recipe to my party list.  For some reason this seems like better party bread than the Greek Celebration bread to me.

Watched Pot… Bagels!

Bagels are a real treat for my family.  We all love them and there aren’t many bagel shops out here in the sticks.  So, I was happy to finally learn how (thank you BBA Challenge!) to make our own.

Like most formula’s in Peter Reinhart’s book The Bread Baker’s Apprentice (2001), the process starts the night before you actually bake.  So, I started the bagel making process with a poolish (like Whinny the Pooh plus a “lish”).  Once the poolish had developed into a bubbly soup of flour, water and yeast I made the stiff dough, kneaded it until my arms were wobbly, and then formed the dough into bagel shapes.  Next I followed the formula and stuffed the bagels into the fridge to await the morning boil and bake.

shaped bagels
While I was shaping these bagels I had visions of early morning boiling and a yummy breakfast for the family.

In the morning, the old saw about a watched pot drove me nuts.  It was so early and I was so ready to boil!  I had my oven running at 500 F and accidentally left a roasting pan in the oven (it was early and the sun was in my eye, and … fill in the blank).  So the roasting pan at 500 F and a watched pot of water caused the smoke detector to alarm.  At 7:15 AM.  Dang it!  Our smoke detector system links all the smoke detectors in the house together.  To say the least the dog ran from room to room trying to escape the noise but found no relief!  What a nice way to say Good Morning to your kids and wife!

Fresh Bagels
Once the bagels finished I pulled them out and put them on the cooling racks. The smell and anticipation were awesome.

I boiled the bagels 2 minutes on each side (4 minutes) total, sprinkled them with things like onions, garlic, salt, and sesame seeds, and stuffed them in a hot oven.  I was really surprised that the bake time was so far off (or I’m off and the book is right, I’m not sure).  The book recommended 5 minutes then rotate the baking sheets and 5 more minutes.  I ended up rotating the baking sheets every 5 minutes for close to 20 minutes!  To top it all, the bagels are not as dark as I like.  I’ll have to do some research to figure out what happened – maybe two baking sheets in the oven kept the heat from circulating.

These were simple and delicious.  And, just like the pizza dough we made earlier this week, the bagels are a hit and will make it on to the “bake often!” list.

Pizza Night

I got this awesome pizza recipe from The Fresh Loaf.  I guess it is not so strange that the recipe has roots in Peter Reinhart’s arsenal of help for the home baker (that guy is everywhere).

I got the idea from not wanting to eat what I had planned for dinner.  Earlier in the day I had plopped a whole chicken in the crock pot for a 6 hour roast.  Although it is delicious, it is a meal we have regularly.  All I can say is that creativity comes when you don’t want what you have planned!  I was reading on The Fresh Loaf forum when I stumbled on the Pizza dough recipe and techniques; I ran into the kitchen and whipped up the dough, divided it out, and put it in the refrigerator for a nice slow ferment.

Roasted Chicken and Onion Pizza
Roasted Chicken and Onion Pizza. Square... the shape of the back of a cookie sheet.

Once the family was home from school, work, and hunkered down for the incoming blizzard (we really got dumped on last night).  I pulled the meat off of the chicken bones, cut it up, grabbed some mozzarella cheese, parmesan cheese, and some garlic.  I didn’t have any red sauce or any tomatoes to make the sauce suggested in the article so I made sauce-less pizza with some extra virgin olive oil and all-purpose seasoning.

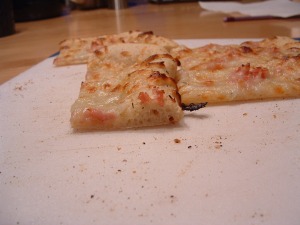
Baked Pizza cooled just enough to pick up and shovel in!

As you can see, the pizza’s are rectangle because I use the back of a cookie sheet as a peel.  My lovely wife bought me a pizza stone for Christmas so I cranked up the oven to 500 (my gas oven only goes up to 550 or I would have gone higher), and slid our non-traditional roasted chicken, onion, garlic, herb pizza directly on the stone (parchment paper and all).  After about 6 or 7 minutes in the hot oven is when the crust had risen around the edges and the cheese melted beautifully.  We had the best time eating while we cooked.

We made an all cheese pizza, an olive oil and parmesan bread stick pizza, and lastly a ham, onion, and cheese pizza.  I had a great time turning a roasted chicken into a family event.  The Mrs. and I even talked about having a regular pizza bake night.  So simple and good.  Bye bye pizza delivery guy.  Unless we’re desperate I don’t think we’ll order pizza again.

Ham and Onion Pizza
Ham and Onion pizza crust was perfect. I sprinkled some cheese out on the edges so it would be visually delicious too.

Greek Celebration Bread

Bring on the party!  Lets bake some bread!  Not something you hear very often from a guy who brew’s his own beer (yes, its another yeast implementation but the theme is the same as bread… my son calls me a yeast bender after his favorite character Aang). So, normally the Mrs. and I are ogling the hops and IBU’s of some double IPA; but that’s another blog.  This one is about Greek Celebration Bread.

Peter R. (The Bread Baker’s Apprentice – 2001) does a great job of describing how other cultures would bake bread on celebration days like Christmas and Easter.  They would pack these loaves with all sorts of spices and goodness, then take them down to the local priest to have them blessed.  I think the whole thing is awesome.  I’m certain that generations of grand parents, parents, kids, the works would be fully aware that there was bread on the rise and there would soon be a party.

Greek Celebration Bread Spices
That little bottle of ground clove cost as much as 12 loaves of home baked bread!

The Greek Celebration Bread formula has a few spices in it, some of which I didn’t own.  A trip to the store to buy ground clove ($ kaa-ching! $), and nutmeg would round out the ingredient list.  I had the others; ground cinnamon, ground all spice, honey, and lemon and almond extract.  This sounds like the making of a good pumpkin pie doesn’t it (pronounced punkin ’round these parts)?  The cool thing about this formula is that it starts with a cup of barm!  Yay! Another cool way to use my sourdough starter!

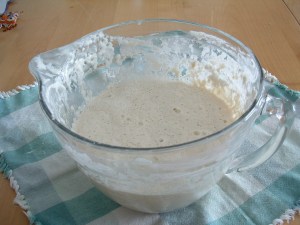
bowl of barm
This messy bowl of barm has provide my family yummy sourdough bread!

In all the excitement of making this bread – it has 10 times more ingredients than any bread I’ve baked – I forgot to add 1.5 teaspoons of commercial yeast. Oh no!!!  I remembered this when I saw the frothing little cup of hydrated active dry yeast sitting on the counter next to the beautifully kneaded ball of dough in a nice oiled bowl.  Dab-nabit!  The kids were around so I couldn’t say what was really on my mind.  Well, the wild yeast in the barm will have to do all the work (I’m certain they probably feel under appreciated anyway, now this!).

Since I neglected to add commercial yeast to the dough I increased my bulk fermentation time to 2.5 hours and behold the dough had risen!  I didn’t punch down the bread, but instead tri-folded it a couple of times to try not to ruin all the good work the yeast had achieved.  I formed the loaf  gently and extended the proofing time to 2 hours.  To say the least, if this loaf turned out we would be celebrating for sure.

Artos: Greek Celebration Bread
After 2 hours of proofing, baked at 350 for close to 50 Minutes.

I skipped the optional glaze and all the fancy shaping the book recommends.  I was simply happy to shape this into an oval loaf and let it bake.  The bread filled the house with sugar and spice and everything nice (like my wife and daughter).  A slice of this bread with a little butter is like desert.  Mmm, I think I’ll go have a slice now!

Barm

I’m the kind of guy who has song associations with odd words and phrases.  When I’m in rare form (or not so rare, I don’t know) my son will say something like, “Gosh Dad, you’ve sung a song for everything I’ve said in the past hour!”.  He’s 8 years old and it brings me to tears that he picks up on my whack brain ticks…  So where am I going with this?  Barm is one of those words for me. Nearly every time I read or hear the word I sing Diana Krall’s version of Frim Fram Sauce.  I don’t think she even says the word in this song, but its almost like a drooling dog’s response to a bell.

So Barm you say?  What the heck is that?  Well, its a fancy word for sourdough starter.  And, sourdough starter is another phrase for saying wild yeast.  You make a starter by collecting wild yeast from a whole grain rye flour or some other slightly processed flour.  You add water and flour to feed it and eventually your starter will collect and grow enough wild yeast to be used in bread;  sourdough bread more specifically.  It is also used in pretzels and a number of other yummy delights.   I took the easier route and bought a fresh starter from King Arthur Flour.  It came in the mail and I was able to feed and grow this little 1 oz starter into a big bowl of barm.  The starter comes with a simple sourdough bread recipe and it turned out great!

I’ve now moved into the world of “what else can I bake with this Barm?”  Fortunately the list is very very long.  And, I love that song by Diana Krall.  I’m probably going to drive my family nuts.  Hopefully they enjoy the baked goods enough to ignore the off key, off rhythm singing.

Anadama Bread

Anadama!  My kids think that I’m a potty mouth when I say that.  And, I certainly did say that aloud after I pulled the plastic wrap from the bowl after bulk ferment phase of this bread.

A key ingredient to Anadama (potty mouth) bread is molasses, and from where I come from very little has molasses in it save a cookie or two.  I mean VERY little… the grocery store had so little that I was forced to buy either the last bottle of blackstrap molasses or Granny’s Molasses.  In the book Peter R. suggests that finding a highly refined molasses tends to make a better tasting bread.  Dama is right!  I used what I could find…

Sitting at room temp. the bulk ferment took 2 hours

The formula is nearly 70% fully hydrated corn meal and 6 tablespoons of molasses.  When I pulled the plastic wrap from the bowl to punch down and shape the dough a strong pungent smell of sweet corn and molasses smacked me in the nose.

The dough was supple and grainy. I had to use lots of flour to punch down and shape it.

Once I got the dough divided out into two pieces, it was easy to roll into logs and place it in the bread pans.

I rolled the loaves by pinching over an 8th of the dough over and over. Maximizing the tension of the surface.

Once I had the dough nicely rolled and panned.  I sprayed a little oil on them and covered with plastic wrap.  Time for a second rise.

Waiting for the final proof took another 2 hours. Such a cold day (it was -8 F on this day)

The formula in the book suggested that I wait until the bread “fully” crested over the edges of the pan.  I’m not sure what fully crested means.  So I took my best guess.  Next, I sprayed the loaves with water and dusted them with cornmeal.  I had visions of corn bread and bean soup after using this much corn meal in a loaf of bread.

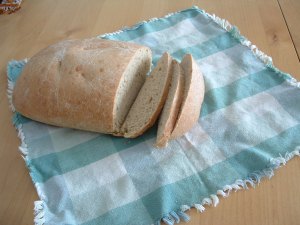
The loaves baked for 50 minutes at 350 F. Nice and golden brown.

At first, I didn’t like this bread.  But it has grown on me… Or maybe it’s better the second day.  I’ve toasted it, eaten it as a sandwich (ham and cheese), and for dinner we broiled it with butter and Parmesan cheese.  Not bad for molasses and cornmeal.

The Challenge! Bread Baker’s Apprentice

I enjoy baking bread and have Peter Reinhart’s book The Bread Baker’s Apprentice (2001).  I’m planning on baking every formula (first to last) over the next year and posting the results here on this blog.

I got the idea from a group that started this in 2009.  A good excerpt of their progress is on th Pinch My Salt blog.

See you soon with Anadama bread!